BENTO RECIPES – APPETIZERS/PORTABLES/SIDES
CARROT AND TOFU WITH SESAME DRESSING
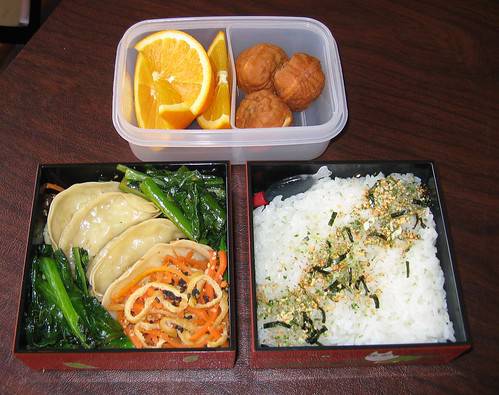
Left: shrimp gyoza (non-GF), sauteed Chinese broccoli, carrot and tofu in sesame dressing
Top: orange wedges and Korean walnut cookies (non-GF, cakey outside filled with adzuki bean paste and walnut)
Not pictured: onigiri with tuna/light mayo/wasabi filling — thanks for the tip, ichigogeisha!
Ingredients*
1 3″x5″ rectangle of usu-age tofu**
1 tbsp. rice vinegar
1 tsp. sugar
1 tsp. sake
1 tsp. reduced-sodium tamari
1/2 tsp. salt
1/2 tbsp. canola oil
3 cups carrots, cut into matchsticks (or use pre-packaged shredded carrots)
1/6 cup toasted and ground white sesame seeds***
1 tsp. toasted sesame oil
Steps
- Rinse the tofu with boiling water, then drain and blot out the excess moisture (this will remove excess oil). Slice the tofu into thin strips.
- Combine the vinegar, sugar, sake, tamari, and salt in a small bow. Stir until the sugar is dissolved.
- Heat the oil in a large skillet over medium high heat. Add the carrots and tofu and saute until the carrots are crisp-tender, about 3 mintues. Reduce the heat to medium-low and add the sauce mixture. Cook for 2 more minutes, or until tender but not too soft.
- Turn off the heat, stir in the sesame seeds, and drizzle with toasted sesame oil.
** I use the pre-packaged shredded carrots to save time. Otherwise you can cut your own (2-3 medium carrots).
*** You can buy sesame seeds already toasted, but the best flavor is achieved by toasting and grinding right before you use them.

CHEDDAR, HAM, AND BELL PEPPER MINI-QUICHES
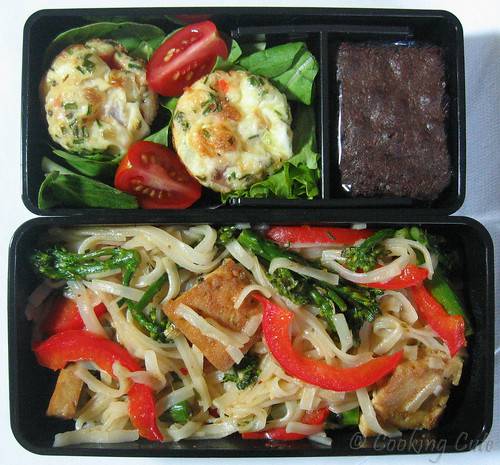
Top: mini-quiches with ham, cheddar, onion and red bell pepper; chocolate truffle brownie
Bottom: lemongrass chili noodles with broccolini, red bell pepper, and garlic-shiitake tofu
GF products used: A Taste of Thai noodle mix, Sunergia “more than tofu”, Gluten Free Pantry chocolate truffle brownie mix
Ingredients*
1 cup onion, diced
1 cup ham, diced
1/2 red bell pepper, diced
2 large eggs
8 large egg whites
2 tbsp fresh chives, minced
3/4 cup reduced-fat shredded cheddar
cooking spray
pinch dried oregano
pinch dried basil
1/4 tsp pepper
Steps
- Preheat oven to 350 degrees. Heat a large nonstick skillet over medium to medium-high heat. Coat with cooking spray and add onion, sautéing until it begins to turn opaque, about 2 minutes. Add the ham and sauté for another 2 minutes. Add red bell peppers and sauté another 2 minutes. Remove from heat and let cool.
- In a large bowl, combine the eggs, egg whites, cheese, chives, oregano, and basil. Add the sautéed mixture and stir well.
- Coat 2 12-mini-muffin pans with cooking spray and spoon mixture into the 24 wells. Bake for 20-25 minutes, or until set.
- Can be served hot or at room temperature. Can also be frozen.
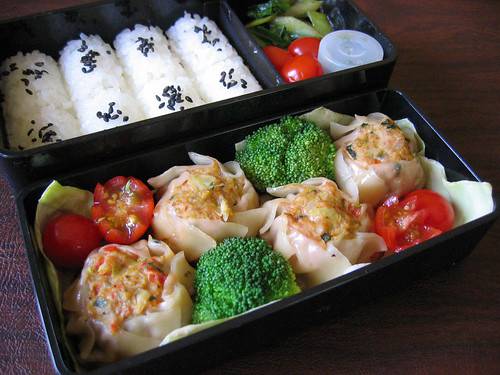
CHICKEN DUMPLINGS
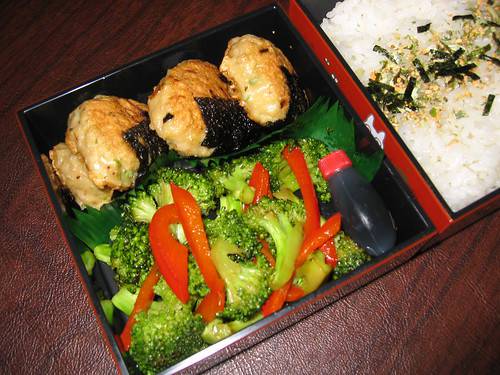
Today we have chicken dumplings, which my hubs just informed me are his new most favorite bento item, and a broccoli and red bell pepper stir-fry. On the side is the ever present rice and furikake.
Ingredients (for one serving)*
3 oz. ground chicken
2 tsp. flour
2 tsp. cornstarch
1 tsp. beaten egg
1/2 tsp. salt
minced scallion (or naganegi if you can get it)
pepper
4 strips of nori** (approx. 1.5″ x 2.5″)
Canola oil for frying
Steps
- Combine the ground chicken, flour, cornstarch, egg, scallion/naganegi, salt, and pepper in a bowl. Knead to combine.
- Divide the chicken mixture into 4. Shape each dumpling into a half-circle, then wrap a strip of nori along the flat edge of the dumpling.
- Heat 1 tsp. of oil (more if needed) in a frying pan over medium heat. Add the dumplings and fry on both sides until golden. Reduce heat and continue cooking for an additional 2 minutes, or until done.
So simple right? 😉
** You can also wrap half of the dumplings using shiso (also called beefsteak) leaves if you have them. I didn’t have any fresh ones on hand, so I used nori for all.
GREEK TAMAGOYAKI WITH SPINACH, TOMATO & FETA
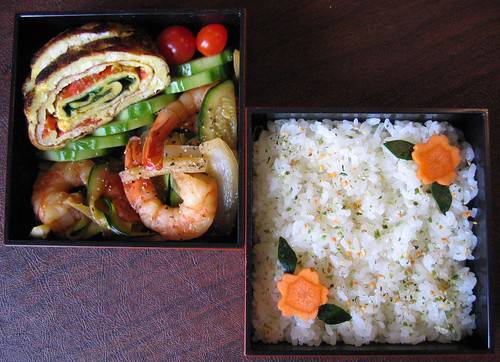
Left: “Greek tamagoyaki” with spinach, tomatoes & feta cheese, sliced-cucumber separator, and a teriyaki stir-fry of shrimp, zucchini & onions
Right: rice with furikake
Dessert: (not pictured) a honey tangerine (that cost a whole dollar!!)
Ingredients*
4 large eggs
1/2 tsp. salt
pepper to taste
fresh baby spinach leaves
sliced tomatoes (I sliced grape tomatoes, which was all I had on hand)
crumbled feta cheese
canola oil cooking spray
Steps
- Whisk eggs, salt and pepper in a large measuring cup until just mixed.
- Heat a tamago pan* over medium to medium-low heat. Spray the pan with cooking oil, then pour a thin layer of egg into the skillet (about 1/4 to 1/3 of the egg mixture). Tilt the pan to coat the surface evenly with egg and break any air bubbles. Place a layer of spinach leaves on top of the egg. When the egg begins to pucker around the edges, push/roll the egg with chopsticks or spatula from one end of the pan to the other so that you have a cylinder of egg. Leave the “egg log” in the pan.
- Spray the pan lightly with more oil. Pour more egg in the pan and tilt it to spread the egg around. Lift the egg log and let the egg run underneath (it will help the rolling process). Spread the sliced tomato top of the egg and, once the egg starts to pucker, use the egg log as your core and roll in the other direction. Try to keep the egg log as ‘tight’ as possible while you’re rolling
- Again, spray the pan lightly with cooking oil and add another egg layer, tilting the pan and allowing the egg to run underneath the egg log. Crumble feta cheese over the last layer of the omelet. Once the egg starts to pucker, roll the egg log over the last layer and let it sit for a few moments with the flap on the bottom to seal up nicely. Watch your heat and lower it towards the end of cooking to prevent the log (as it gets bigger) from browning too fast due to its weight.
- Remove the log from the pan and cut into 8 equal pieces. If your log is not as uniform as you like, you can roll it using a sushi rolling mat (lay down a layer of plastic first).
* A tamago pan is rectangular, allowing your egg log to come out evenly. You can use a circular pan – your egg log will just be a little fatter in the middle than on the ends.
INDIAN-STYLE CHICKEN CHUNKS
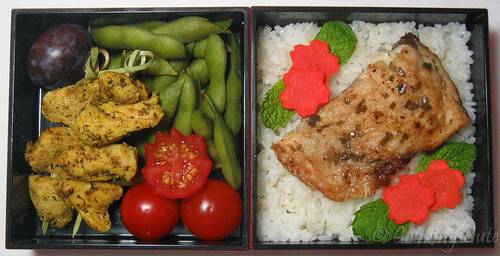
Ingredients*
2-1/2 pounds chicken breasts
2 tsp freshly ground black pepper
1/2 tsp turmeric
1/2 tsp cayenne pepper
2 tsp dried thyme leaves
2 tsp cumin
1/2 tsp garlic powder
1-1/2 tsp salt
2 tbsp canola oil
Steps
- Preheat the oven to 350 degrees F.
- Cut chicken into chunks, approximately 1″x1″x1″. Place into a bowl and all dry ingredients plus 1 tbsp canola oil. Mix chicken with spices and let sit for 20 minutes.
- Heat remaining tbsp of oil in a wok (or large nonstick frying pan) over high heat. When the oil begins to smoke, add the chicken. Toss the chicken qiuckly in the wok until all pieces have turned opaque on the outside.
- Pour the chicken into a baking dish and arrange the chunks in a single layer. Cut a piece of wax paper slightly smaller than the bottom of the baking dish and place it lightly on top of the chicken. Bake until chicken is cooked through, about 10 minutes. Remove from baking pan quickly so that the hot pan doesn’t dry the chicken out.
* Use gluten-free products
MANGO-SHRIMP SUMMER ROLLS
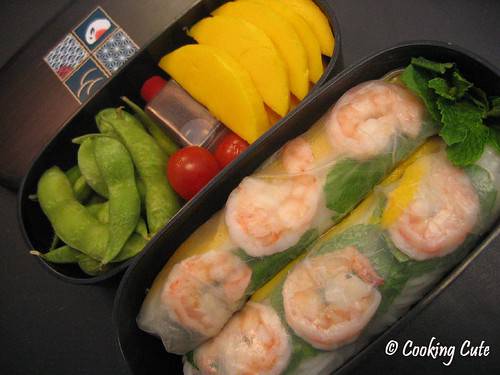
Right: mango-shrimp summer rolls
Left: steamed edamame with kosher salt, dipping sauce for summer rolls, grape tomatoes, more mango!
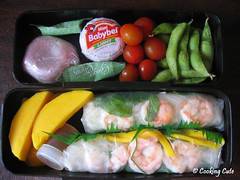
Hubs bento: (see inset) same as mine, but with a daifuku, light Babybel cheese round, and ginger chews
Ingredients*
– Summer rolls –
6 large shrimp, peeled
1/3 package of rice vermicelli (usually each 1lb package is divided in 3 and tied by twine)
3 tbsp sushi vinegar (rice vinegar also will work)
4-1/2″ chunk of seedless cucumber, peeled, cored, and sliced lengthwise about 1/8″ thick
one ‘cheek’ of a large, ripe mango, peeled and sliced lengthwise about 1/8″ thick
handful of fresh chives
handful of mint leaves
handful of cilantro leaves
4 sheets of rice paper (not too delicate if possible, at least 8″ wide), more just in case some tear
– Dipping sauce –
1-1/2 tbsp fresh lime juice
1-1/2 tbsp fish sauce
2 tbsp water
1 tbsp brown sugar
crushed thai bird chili or 1/2 tsp ground chili paste or chili oil (optional)
Steps
- Bring a small pot of salted water to a boil. Add shrimp and simmer for 2-3 minutes or until cooked. Using a slotted spoon, remove shrimp and run under cold water, then drain. Slice shrimp in half lengthwise (and devein if necessary).
- Bring shrimp water back to a boil and add the rice vermicelli. Cook about 3 minutes, or until just tender. Drain in a colander, rinse under cold water, then drain again well. When noodles are fairly dry, add the sushi vinegar and toss to coat. Leave the noodles in the colander so that any excess liquid can drain.
- To make the rolls, wet a round of rice paper in hot water and place on work surface. Arrange a handful of rice noodles in a row along the bottom third of the rice paper. Arrange chives, and strips of mango and cucumber in the space above the noodles and sprinkle some cilantro leaves on top. Fold the bottom of the rice paper over the filling and roll towards the top, stopping after one revolution. Fold the sides of the rice paper in, then arrange some mint leaves in the crease and continue rolling a little further. Stop when there is about 2 inches of rice paper remaining. Place 3 shrimp halves along the crease and finish rolling. Repeat with the other 3 rolls.
- To make the sauce, stir together all ingredients in a small bowl until well-mixed.
- You can also make these 4-6 hrs ahead of time — just place on a platter, cover with damp paper towels and then saran wrap the platter. If you are placing it in a bento, the rolls should be ok for 4-5 hours provided your bento box has a good seal. If you want to be sure, just wrap the rolls in some saran wrap before packing.
* Use gluten-free ingredients
SHRIMP BURGERS WITH CHILI MAYONNAISE
Top: mini shrimp burgers with chili mayo, baby greens, tomato and red onion
Bottom: Trader Ming’s kung pao chicken
Dessert: (not pictured) minneola, strawberries with brown sugar
Ingredients
– Burgers –
1 lb. medium shrimp, peeled, deveined, and coarsely chopped
1/8 cup light mayonnaise
1/2 medium red onion, minced
1/2 tsp. Worcestershire sauce
pinch of cayenne pepper
kosher salt and freshly ground black pepper
1/2 cup plain dry bread crumbs
Canola or safflower oil for frying
– Accompaniments –
1/4 cup light mayonnaise
1/8 cup chili sauce (I use Sriracha)
hamburger buns and/or mini pita breads
tomato slices (or cherry/grape tomato slices)
mixed baby greens
Steps
- Put the shrimp, mayonnaise, onion, Worcestershire sauce, cayenne pepper, and salt and pepper to taste in a large bowl and mix well. Shape into patties and place on a baking sheet. (I find that 1 lb. of shrimp is enough to make 2 regular-sized patties for dinner plus 3 baby patties for bento. You can also double the recipe and make 6 regular-sized patties.) Cover with plastic wrap and chill in the refrigerator for 4-5 hours or overnight. (These also freeze well at this point.)
- Put the bread crumbs on a plate and carefully dredge the patties. They will fall apart easily — be gentle!
- Pour oil in a skillet to a depth of about 1/2 inch and heat over medium heat until hot, but not smoking (use a small frying pan and much less oil if you’re doing the bento-sized patties). Fry the patties until crisp and golden, about 5 minutes per side for regular patties and 3 minutes for bento patties. Check and adjust the heat to make sure they don’t burn. Drain on paper towels.
- Combine the chili and mayonnaise in a small bowl and mix well. Spread the underside of each hamburger bun (or the insides of the pita breads) with the chili mayo, place a burger on the bun, then top with tomato slices, onion rings, and lettuce. Ta da!
*** This recipe is adapted from The Beach House Cookbook by Barbara Scott-Goodman.
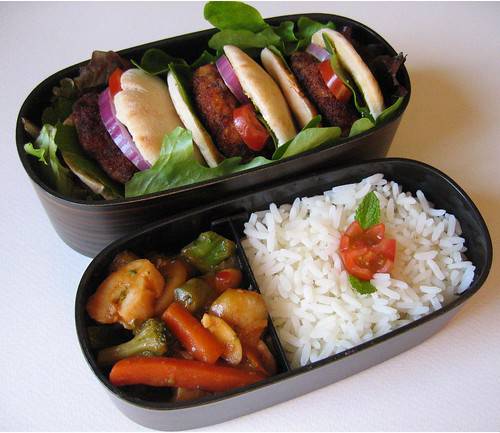
TURKEY BURGERS WITH SPECIAL SAUCE
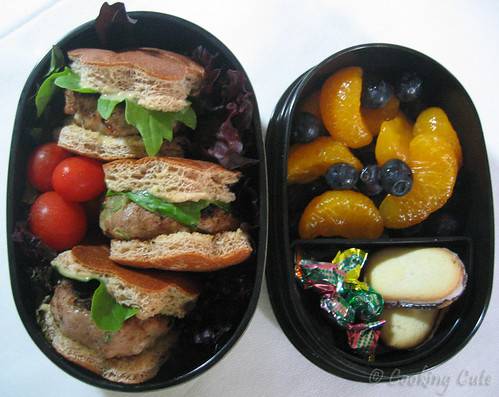
Left: mini-turkey burgers on ‘flower’ buns; grape tomatoes
Right: mandarin oranges, blueberries, mini-mint Milano cookies (non-GF), confetti candy
Ingredients*
– Burgers –
1/4 cup scallions, thinly sliced or chopped
2 tbsp orange juice
1 tbsp low-sodium tamari
1 tsp ginger, peeled and finely chopped
1 garlic clove, minced
1lb. ground turkey breast
Cooking spray
4 hamburger buns (or however many mini-buns you need if you’re doing bento burgers)
4 curly leaf lettuce leaves (or a lettuce mix)
– Special Sauce –
3/4 cup reduced-fat mayo
1 1/2 tbsp scallions, thinly sliced
2 tbsp dijon mustard
1 tbsp honey
1 tsp orange juice
1 tsp low-sodium tamari
1/2 tsp ginger, finely chopped (or use the kind in a tube)
Instructions
- Combine first 6 ingredients in a large bowl.
- Divide turkey mixture into 4 equal portions, if making normal burgers. The recipe is enough for 2 normal burgers and 4-6 mini burgers depending on the size of the mini-bun you are trying to fit. Whether normal burger or mini, they should be about 3/4″ thick.
- Place normal patties on grill rack coated with cooking spray; grill 6 minutes on each side or until done. Or, if making mini burgers, pan frying is fine, about 4 minutes per side or until cooked through.
- Combine all sauce ingredients in a medium bowl and mix well.
- Spread Special Sauce over top and bottom halves of each bun. Place lettuce leaves on the top halves of buns; top bottom buns with a burger patty, then top with the top bun and lettuce. If you’re doing normal bugers, cut them in half before serving.
* Use gluten-free products
MIXED-RICE ONIGIRI IN 3 FLAVORS: GINGER BEEF, SWEET EGG & PICKLED PLUM
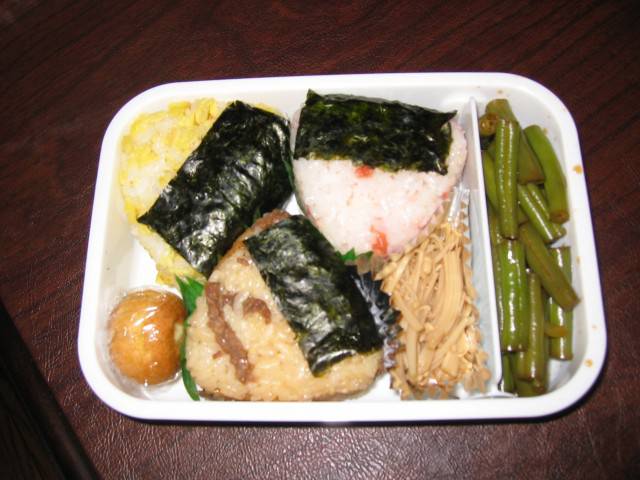
Three flavors of onigiri (beef & ginger, sweet egg, and umeboshi), as well as simmered green beans, simmered enoki mushrooms, and a mini choux-a-la-creme pastry (non-GF).
3 KINDS OF ONIGIRI
Ingredients*
Rice (for 2 sets of 3 onigiri, I used 4 cups uncooked rice)
Nori (optional)
– Beef –
Ginger to taste, grated (or julienned finely)
1 tbsp. tamari
1 tsp. each of sugar, mirin, sake
1 tbsp. water
2 oz. beef, sliced thin, then julienned
– Egg –
1 small egg, beaten
2 tsp. sugar
salt
cooking oil
– Umeboshi –
1 umeboshi
Steps
- Cook the rice.
- Combine all the ingredients for the beef onigiri except the beef. Bring to a boil in a small pan. Add the beef to the pan and cook for 3-4 minutes and set aside.
- Combine all the egg ingredients except the oil. Heat a small amount of oil to the pan, then add the egg mixture. Scramble the egg, stirring rapidly, until the egg has separated into small, round pieces.
- Remove the seed from the umeboshi and shred it into small pieces.
- Divide the rice into 3 portions. Combine each portion with a different flavored mixture. Be sure to not add so much of the beef cooking juice that your rice gets soggy or slippery.
- Form the rice into flattened balls. I use an onigiri mold as it is faster, but you can shape by hand as well. Make sure to wet your hands or the molds between rice balls to keep the rice from sticking. Add a strip of nori to each if you like.
*Use gluten-free products.
PAN-SEARED CHICKEN SKEWERS WITH CHILI-BBQ SAUCE
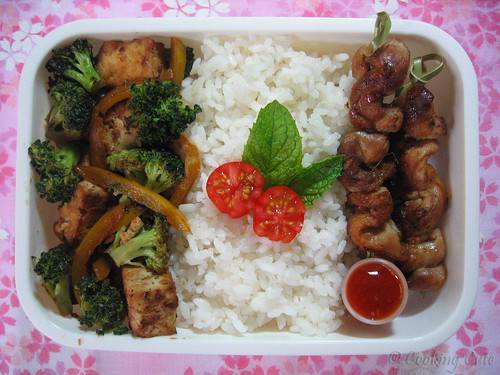
Left: broccoli and yellow bell pepper stir-fried with Thai peanut tofu (from Sunergia)
Right: pan-seared chicken skewers with chili-BBQ sauce
Ingredients*
1 lb boneless, skinless chicken thighs, sliced into strips (or leave whole if you’re doing dinner)
1 tsp toasted sesame oil
– Marinade –
1/4 cup shallots, chopped
4 garlic cloves, minced
2 tbsp brown sugar
1 tbsp fish sauce
juice from 1 lime
1-1/2 tsp toasted sesame oil
– Sauce –
3 tbsp ketchup
1 tbsp Sriracha chili sauce
2 tsp honey
1 tsp minced ginger (or prepared ginger paste)
4 tsp rice vinegar
Steps
- Combine shallots, garlic, brown sugar, fish sauce, lime juice, and toasted sesame oil. Place the chicken and marinade into a large ziploc bag. Squeeze the air out and seal; then knead the chicken and marinade together. Marinate in the refrigerator overnight (or at least 4 hours).
- Heat 1 tsp of toasted sesame oil in a large skillet over medium-high heat. Thread the chicken on wooden skewers and add to the pan. Cook, turning the skewers, until the chicken is browned on all sides, about 1-2 minutes per side. Reduce the heat to low, cover the skillet, and cook until the chicken is done (about 5-6 minutes, rotating the skewers occasionally).
- While the chicken is cooking, combine the sauce ingredients and mix well.
*Use gluten-free products.
SUNDRIED-TOMATO CHICKEN BUNS

Left: Stir-fry of snow peas, tomatoes, mushrooms, onion, and chicken thighs
Right: rice, fish container of sauce from stir-fry, sundried tomato bun

Ingredients*
– Dough –
1 package of Chebe bread (original)
4 oz. shredded cheese (your choice, but not too sharp or salty for this recipe)
2 eggs
2 tbsp
1/3 cup water
– Filling –
3/4 lb. boneless, skinless chicken thighs
1/3 cup diced onion
4 oz. sundried tomatoes, finely chopped, oil reserved
1/2 tsp. dried basil
salt and pepper, to taste
Steps
- Heat 1 tbsp of the oil from the sundried tomatoes in a skillet over medium to medium-high heat. L:ightly season the chicken thighs with salt and pepper and add them to the skillet. Saute until cooked through, about 3-4 minutes per side. Remove from heat and let cool.
- Add diced onions to the same pan and cook until onions have softened and are translucent. Remove from pan and place in a large bowl.
- When cooled, shred the chicken thigh meat and add it to the bowl with the onions. Add in the sundried tomatoes and basil and mix well. Season to taste with salt and pepper (and more basil if desired).
- Preheat the oven to 375 degrees F. Prepare Chebe bread dough using cheese, eggs, oil and water according to the instructions on the package.
- Pull off a hunk of dough and roll it into a ball about 2″ in diameter. Flatten the dough ball onto a work surface using the heel of your hand (or a rolling pin if you really want). The dough is a bit oily, so it will not stick to the work surface.
- Place about 1 tbsp of chicken filling in the center of the flattened dough. Pull up the edges of the dough and fold it into the center, pinching the dough to seal the filling in. Flip the filled dough ball over and press it lightly into a rounded, slightly flattened bun shape. Place on non-greased cookie sheet or silpat and repeat with remaining dough and filling.
- Bake for 25-30 minutes, or until golden on the top.
Buns can be frozen in a single layer, then placed in freezer bags for storage. Defrost overnight and reheat in the oven or in the microwave.
* Use gluten-free ingredients if you are gluten-sensitive.
TAMAGOYAKI WITH SPINACH
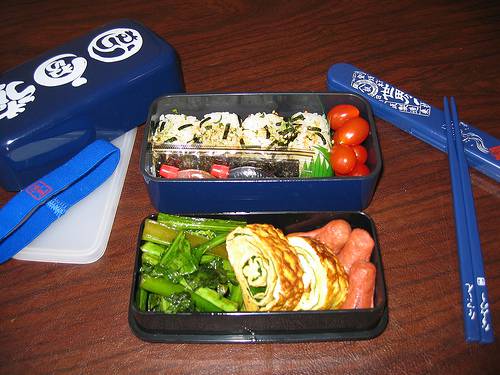
Bottom level: rice with furikake, grape tomatoes, a cello-wrapped packet of teriyaki-flavored nori, and containers of soy and chile sauces.
Top level: stir-fried Chinese broccoli, tamagoyaki (rolled-omelet) with spinach (GF), and mini franks
Dessert: orange wedges and mini-choux a la creme pastries (not pictured).
Ingredients
8 large eggs
2 tbsp. dashi or water
1 tsp. sake
1/2 tsp. sugar
1/2 tsp. reduced-sodium tamari
salt to taste
fresh baby spinach leaves
canola oil
Steps
- Whisk eggs in a large bowl until just mixed.
- In a small bowl, whisk together the dashi/water, sake, sugar, tamari, and salt to taste until the sugar is dissolved. Add to the eggs and stir to combine. Transfer the mixture to a measuring cup/container with a spout.
- Heat a tamago pan** over medium heat. Add 1/2 tsp. oil and brush over the surface of the skillet with a pastry brush. Working in batches, pour a thin layer of egg*** into the skillet. Tilt the pan to coat the surface evenly with egg. Place some spinach leaves on top of the egg. When the egg begins to pucker, around the edges, push/roll the egg with chopsticks or spatula from one end of the pan to the other so that you have a long cylinder of egg. Leave it in the pan.
- Brush the pan with more oil. Pour more egg in the pan and tilt it to spread the egg around. Lift the egg log and let the egg run underneath (it will help the rolling process). Spread more spinach leaves on top of the egg and, once the egg starts to pucker, use the egg log as your core and roll in the other direction.
- Repeat the process, fattening the log as you go. Watch your heat and lower it towards the end to prevent the log (as it gets bigger) from browning too fast due to its weight.
- Remove the log from the pan and cut into 8 equal pieces.
** A tamago pan is rectangular, allowing your egg log to come out evenly. You can use a circular pan – you egg log will just be a little fatter in the middle than on the ends.
*** If you make the full recipe, about 1/8 of the batter works well. I usually halve the recipe for 2 servings, so I use 1/4 of the batter per layer.
Disclaimer: This is such a long explanation, but I promise it is very simple in practice!
*Use gluten-free products.
TEA MARBLED EGGS
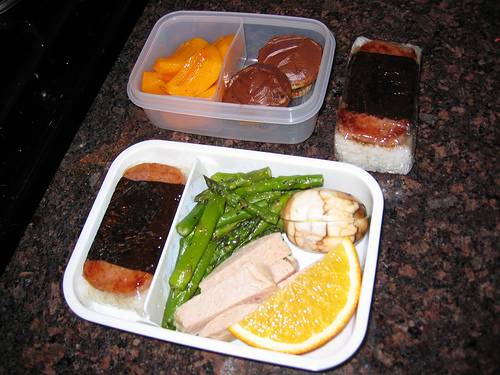
Main bento: spam musubi, stir-fried asparagus, marbled tea egg, gio lua (Vietnamese, um, bologna? – probably not GF but not sure), orange.
Snack bento: persimmon wedges, mini fudge-marbled cupcakes (not GF).
And an extra spam musubi to snack on.
Ingredients*
Eggs – however many (best if they can fit in one layer in the pot)
Black tea – 2 tbsp., any kind (this time I used 5 bags of vanilla-flavored black tea from Mighty Leaf)
Cinnamon sticks – 2
Star anise – 4 “stars”
Tamari – 2 tbsp. (I use low-sodium)
Salt – 1 tbsp. (hence the low-sodium tamari)
Sugar – 1 tsp.
Steps:
- Cover eggs in saucepan with cold water and bring to a boil over medium heat. Hard boil the eggs (usually 10-12 minutes cooking time).
- Drain eggs and allow them to cool enough that you can handle them.
- Using the back of a heavy spook, crack the eggs all over, but do not remove the shells (or you can roll them a la Pacino in Angel Heart). Try not to crack through the membrane under the shell.
- Place the cracked eggs back in the saucepan. Add in the tea, cinnamon, star anise, tamari, salt, sugar, and enough water to cover the eggs.
- Simmer for at least an hour and up to 2-1/2 hours or longer.
- Drain and allow to cool to room temperature.
You can refrigerate these little guys in their shells. Just peel them whenever you’re ready to eat them. Great for a snack or a party platter (halved with yolk-side down to show off the pretty marbling).
*Use gluten-free products.
THAI-STYLE DUMPLINGS WITH MINTY CILANTRO-LIME DIPPING SAUCE
Front: homemade Thai-style dumplings with pork and veggies (not GF), grape tomatoes, steamed broccoli
Back: rice with black sesame seeds, stir-fried bok choy, grape tomatoes, container of cilantro-lime dipping sauce (GF)

Ingredients
– Dumplings –
1 lb. ground pork
1/4 cup minced scallions
2 tbsp. minced cilantro
2 tsp. minced ginger
1 red bell pepper, minced
2/3 cup minced cabbage
2 small garlic cloves, minced
1/2 tsp. toasted sesame oil
2 tbsp. soy sauce
1/2 tsp. salt
pepper to taste
1 large egg, beaten lightly
45-50 shumai wrappers (or round wonton wrappers), thawed if frozen
– Sauce –
1 tbsp. fish sauce
2 tbsp. fresh lime juice
1 tbsp. rice vinegar
1 tsp. sugar, or to taste
2 tsp. minced ginger
1 tbsp. shredded mint leaves
1 tbsp. finely chopped cilantro
Steps
- In a bowl, add the scallions, pork, ginger, bell pepper, cabbage, garlic, oil, soysauce, coriander, egg, salt, and pepper. Mix well with hands. Cook a bit in the microwave and adjust seasonings to taste. Cover and chill filling for 1 hour (or overnight).
- Put a heaping teaspoon of filling in the center of a wonton wrapper, then moisten the edge of the wrapper with water. Form into the dumpling shape of your choice (regular wonton triangles or half-moons, little gathered purses with the filling completely enclosed, etc.). To make ones like mine, pinch the wrapper closed around the filling, forming a mulit-pointed star-like shape with the filling exposed in the middle. Then push all of the points in one direction and squoosh the filling and the dumpling into the shape you want. With a wet fingertip, flatten out the top of the dumpling. Place on a cookie sheet lined with wax paper.
- Continue making dumplings until you run out of wrappers or filling. At this point, the dumplings can be frozen on the cookie sheet or cooked right away. I froze mine overnight, then popped them into freezer bags the next day.
- To cook the dumplings, heat a small amount of oil in a frying pan. Place the dumplings in and cook for 1 minute, or until the bottoms begin browning. Then place about 1/4″-1/2″ of water in the pan, cover and steam until the water is absorbed. Continue adding water as it is absorbed until the dumplings are cooked all the way through (it usually takes at least 6-7 minutes if cooking straight from the freezer).
- To make the sauce, just combine all of the sauce ingredients and mix well. Adjust as you like.
* NOTE: The sauce is pretty strong so do not liberally douse your dumplings before tasting first!
THAI-STYLE "SUSHI" SANDWICH ROLLS*
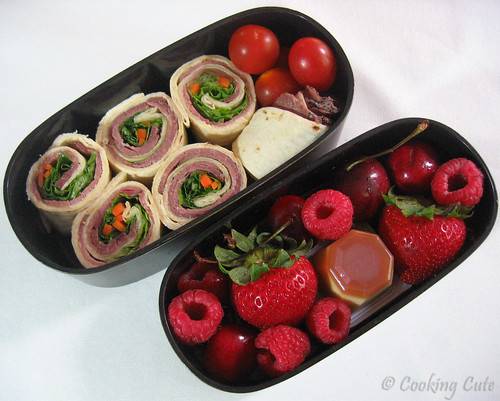
Top: Thai-style “sushi” sandwich rolls, grape tomatoes
Bottom: strawberries, raspberries, cherries, petite pudding
Ingredients
2 tbsp lime juice (preferably fresh)
2 tsp Thai-style fish sauce (Vietnamese fish sauce is saltier, etc.)
1 tbsp toasted sesame oil
1 tsp sugar
1 tbsp minced ginger
1 tbsp minced garlic flour tortillas (mine had an 8″-diameter)
romaine lettuce (from a bag is fine!)
sliced roast beef from the deli (for 4 wraps, I used about 3/4lb. of beef)
handful of shredded carrots
handful of fresh mint leaves
Steps
- Combine the lime juice, fish sauce, sesame oil, sugar, garlic, and ginger in a small bowl. Stir well with a fork or whisk to combine. Taste and adjust seasonings to your preference.
- Spread the sauce mixture on a tortilla using a pastry brush. Do not sop the poor tortilla with excess liquid.
- Lay 2 roast beef slices on the tortilla to cover most of it. You can add more if you like really beefy rolls. Lay some lettuce leaves down the middle of the tortilla, but to one side. Arrange some carrots and mint leaves on top of the lettuce. Sprinkle a teaspoon of sauce over the toppings.
- Roll the tortilla up tightly, beginning with the half with the toppings. Let the tortilla rest seam-side down while you make the remaining rolls. Slice and serve.
*Adapted from a Cooking Light recipe for Thai Beef Rolls.
TOFU-EGG SCRAMBLE
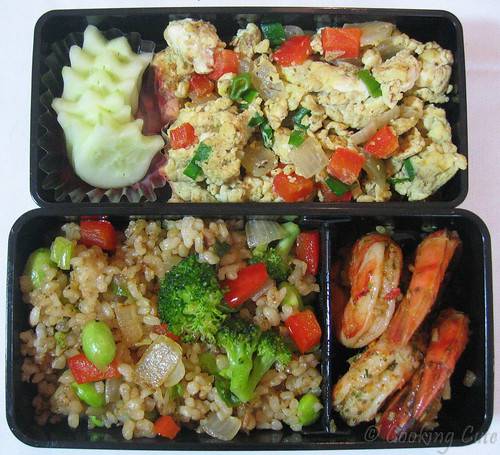
Top: tofu-egg scramble; cucumber tulips
Bottom: wok-fried brown rice with onion, scallions, red bell pepper, edamame, and broccoli; shrimp rubbed in olive oil, Old Bay, and other seasonings (courtesy of Wegmans)
Ingredients
4 large eggs
1/2 block silken tofu
1/2 small onion, diced
1/2 red bell pepper, diced
2 scallions, thinly sliced
1-1/2 tsp. garlic, minced
1 tbsp canola oil
1/2 tsp curry powder
1 tsp tamari
salt and pepper, to taste
- Rinse the tofu and pat dry with a paper towel. Set aside.
- Crack eggs into a small bowl and beat lightly with a fork or whisk. Mix in the scallions and salt and pepper to taste. Set aside.
- Heat oil in a wok or large frying pan over medium-high heat. Add the onion and toss until shiny with oil. Add the red bell pepper and toss with onion until well-mixed.
- Add the tofu block and toss with the vegetables, using a spatula to break up and crumble the block into smaller pieces. Cook the tofu for at least 5 minutes, using your spatula to flip the mixture and ensure that the tofu is cooked on all sides. The tofu may render some liquid while cooking. If this occurs, cook until most of the liquid has evaporated before moving on to the next step.
- Add the egg mixture to the pan and allow to set for 15 seconds. Add the tamari, curry powder, additional salt and pepper to taste, then fold the egg mixture into the tofu-veggie mixture. Continue tossing the egg with the other ingredients, being careful not to break the egg up too much, until the egg is thoroughly cooked, about 2-3 minutes.
- Taste and adjust seasonings as needed. Makes 2 large servings or 4-5 bento servings.
* Ensure that your ingredients are GF if you are gluten-sensitive.
WONTONS WITH PORK AND SHRIMP FILLING

Left: Chinese egg noodles, blanched baby bok choy
Right: homemade wontons stuffed with pork and shrimp filling, slices of Chinese BBQ pork
Front: packet of instant wonton soup broth, ‘wonton’ of scallions for garnish, chile sauce
Ingredients
1 lb. coarsely chopped boneless pork loin, or ground pork
1/2 lb. peeled shrimp, finely chopped
2 tsp. brown sugar
2 tbsp. Chinese rice wine (you can substitute pale, dry sherry)
2 tbsp. reduced-sodium soy sauce
2 tbsp. finely chopped green onion
2 tbsp. wood ear mushrooms, rehydrated in hot water, then finely chopped
1 oz. bean thread noodles (“glass noodles”), soaked in hot water for 15 minutes, drained, then finely chopped
2 tsp. grated fresh ginger
1 package square wonton wrappers
1 beaten egg
Steps
- In a large bowl, combine pork, shrimp, sugar, wine, soy sauce, green onion, mushrooms, noodles, and ginger. Knead with hands until mixed well. Let stand for about half an hour.
- Place about one teaspoon of the filling at the center of each wonton skin. Moisten two adjacent sides of the wonton skin with the egg, then fold the skin over and seal into a triangle. Press the edges firmly to seal. You can then crimp the edges, gather the skin and crimp towards the center to form a little ‘purse’, bring the opposite corners together an seal a la Chinese restaurant style, or leave it fairly flat.
- Continue until you run out of wrappers or filling. Either can be frozen for use later.
- Soup — Before adding to soup, add to boiling water and cook for 5 minutes, or until fully cooked. Otherwise, your broth will become cloudy. A quick broth can be made by combining 3 cups chicken broth, 1 tbsp. soy sauce, 1/2 tsp. sesame oil, and 1/2 tsp. grated ginger (change proportions as needed). Garnish with fresh scallions. You can also add Chinese egg noodles (cooked and drained), blanched baby bok choy or Chinese broccoli, or fresh spinach, as well as slices of pork or cooked shrimp to round out your bowl of soup.
- Frying — These little guys are terrific fried as well. Just heat enough oil to deep fry over medium heat until a piece of wonton skin sizzles when added. Deep fry the wontons in batches until golden, about 2-3 minutes per side, making sure they don’t stick together, and making sure the oil doesn’t get too hot (or the wontons will brown too fast). Drain in a paper towel-lined colander. Serve with duck sauce or plum sauce.
Join Our Mailing List
The temple is funded completely through the kindness of its supporters
Thank you for your support!