BENTO RECIPES – SOUP/SUSHI/SAUCES/DESSERTS
GINGERY SWEET POTATO SOUP
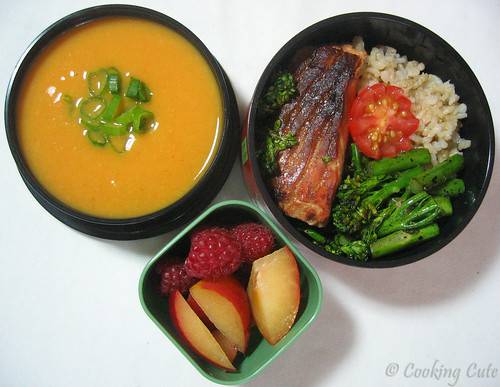
Left: gingery sweet potato soup
Right: miso salmon, wok-fried broccolini, brown rice, tomato
Bottom: raspberries, plum slices
Ingredients*
3 tbsp canola oil
1 medium onion, chopped
1-inch piece of ginger, peeled and slivered
4 cloves of garlic, chopped
1 tsp cumin
2 tsp ground coriander
1/4 tsp turmeric
1/4 tsp cayenne pepper
2 medium sweet potatoes, cut into 1/2-inch dice
2 heaping cups of fresh cauliflower florets
5 cups chicken stock (vegetable is ok)
2/3 cup light coconut milk
salt, to taste
scallions for garnish (or chives)
Steps
- Heat the oil in a large pot over medium-high heat.
- Add the onion, ginger, and garlic and saute until vegetables soften, about 3-4 minutes.
- Add the cumin, coriander, turmeric, and cayenne. Mix the spices in with the vegetables well.
- Add the sweet potato, cauliflower, and chicken stock and bring the mixture to a boil. Lower the heat and simmer until the vegetables are tender, about 10-12 minutes.
- Blend the soup to remove any chunks. I use an immersion/hand blender that I can stick right in the pot, but you also can ladle the soup into a traditional blender – just be careful that you don’t burn yourself. If you want an uber-smooth soup, strain the soup through a colander before returning it to the pot.
- Add the coconut milk and salt to taste. Bring the soup back to a boil in order to heat it through. Garnish with the scallions or chives and enjoy!
* Use gluten-free products
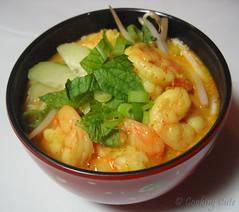
CURRY LAKSA NOODLES
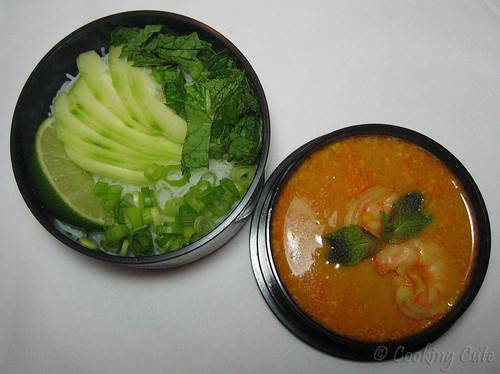
Left: bean sprouts (on the bottom), rice noodles, cucumber, mint, scallions, lime
Right: Shrimp curry laksa
Inset: assembled in the lid of my Totoro bowl bento set — yum!
Ingredients
2 tbsp red curry paste
1 tbsp pine nuts, finely ground
1 tsp ground turmeric
2 tsp water
1 lb rice vermicelli noodles
2 14-oz cans light coconut milk
1 14-oz can low-sodium chicken broth
1 tbsp brown sugar
1 tsp salt
1 lb medium shrimp, peeled and deveined
1 handful fresh mint leaves, slivered
1 handful bean sprouts
3 scallions, thinly sliced
1 English cucumber, sliced into thin 2-inch strips
1 lime, cut into wedges
Sriracha chili sauce
Steps
- Cook rice noodles in boiling water until tender but firm, about 2 minutes. Drain, rinse in cold water, drain again, and set aside.
- Combine curry paste, pine nuts, turmeric, and water in a small bowl and mash with a fork.
- In a large, deep skillet, bring 3/4 cup of coconut milk to gentle boil over medium heat, stirring often. Cook for about 3 minutes, until milk thickens a little and bubbles gently. Reduce the heat to low, add the curry paste mixture and cook, stirring and mashing often, until fragrant, softened and thickened, about 4 minutes.
- Add remaining coconut milk, broth, sugar, and salt. Stir well, increase the heat to medium and bring to a gentle boil. Simmer 10 minutes, stirring occasionally.
- Add the shrimp. Cook for 2 to 3 minutes, stirring occasionally, until shrimp turn pink and are cooked through. Remove from the heat and set aside.
- To serve, top rice noodles in each bowl with bean sprouts and shrimp curry almost to cover the noodles. Garnish with scallions, cucumber, mint, and lime. Serve with Sriracha chili sauce.
* Use gluten-free products
VIETNAMESE PORRIDGE WITH CHICKEN
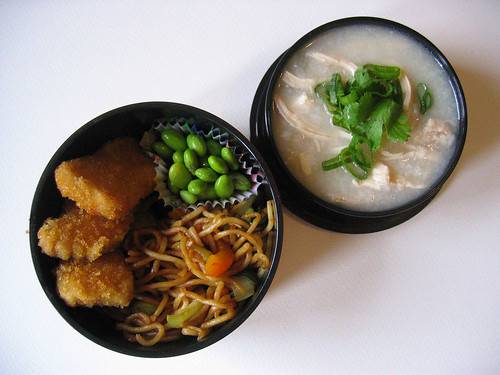
Left: chickenless nuggets (non-GF), edamame, and yakisoba with mixed veggies (non-GF)
Right: chao ga (Vietnamese porridge with chicken) with scallion and cilantro garnish
Ingredients*
– Porridge –
1 cup rice (I use jasmine/long-grain for this recipe)
1 tbsp canola oil
1 onion, coarsely chopped
7 cups water + more
1-inch slice of ginger, peeled, sliced and bruised with the knife handle
4 chicken breasts (or use 1/2 a chicken)
5 cups chicken broth (low-sodium)
salt, to taste
fish sauce, to taste
sugar, to taste
– Garnish –
2 scallions, thinly sliced
5 sprigs cilantro, chopped
black pepper, to taste
Steps
- Wash and drain the rice thoroughly. Heat oil in a frying pan and stir-fry the rice and onion until the rice turns white. Set aside.
- In a soup pot, combine the water, ginger, chicken and salt and bring to a boil. Skim off the foam until clear and simmer until chicken is cooked through, about 20 minutes.
- Remove chicken from pot and add the rice and onion mixture. Simmer for 45 minutes, adding chicken broth as needed to thin the porridge to the desired consistency. Season to taste with the salt, fish sauce, and sugar (I start with 1/2 tsp salt, 1 tbsp fish sauce, 1 tsp sugar and go from there).
- Skin, debone and coarsely shred the chicken and return it to the soup. Before serving, add scallions and cilantro and sprinkle with black pepper.
*Use gluten-free products
TAMAGO (FOR SUSHI)
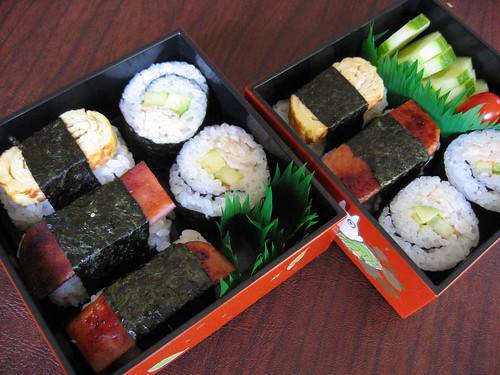
Three types: (1) mini spam musubi; (2) tamago nigiri; and (3) California roll.
Garnish: sliced cucumbers, grape tomatoes, a soy sauce fish (I was in a rush this morning and forgot the wasabi!)
Ingredients*
4 eggs
4 tbsp. dashi (I used 4 tbsp. water mixed with a bit of instant dashi powder)
1 tbsp. sugar
1 tsp. mirin
1/2 tsp. tamari
generous pinch of salt
Steps
- Combine all ingredients in a small bowl and mix well.
- Strain mixture through a sieve to remove most of the egg membrane. It is helpful to strain into a container that has a pour spout.
- Lightly coat a tamago pan (or frying pan) with cooking spray and heat over medium-low to medium heat. Add about 1/4 of the egg mixture to the pan and tilt to coat. Once the egg begins to set, roll the omelet from one end of the pan to the other, creating an ‘egg log’ of sorts. As you will be making sushi, it helps to keep the egg log a bit on the flat side, but this is not necessary as you can shape the log later.
Spray some more oil and pour in another 1/4 of the egg mixture, lifting the egg log to allow the raw egg underneath. Once the egg sets, roll the existing egg log to the other side of the pan. Repeat 2 more times.
- Take egg log out of pan and wrap in a paper towel. Press into the desired shape before cutting (the paper towel will absorb any excess moisture or oil). Then slice for sushi!
*Use gluten-free products.
PAN-SEARED CHICKEN SKEWERS WITH CHILI-BBQ SAUCE
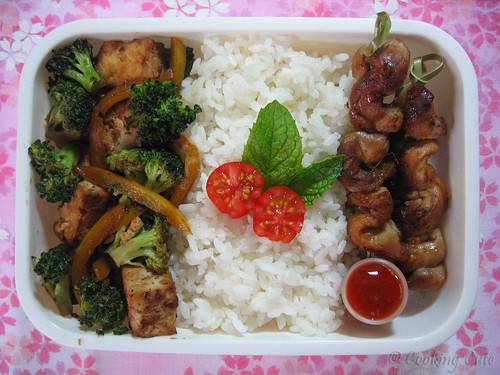
Left: broccoli and yellow bell pepper stir-fried with Thai peanut tofu (from Sunergia)
Right: pan-seared chicken skewers with chili-BBQ sauce
Ingredients*
1 lb boneless, skinless chicken thighs, sliced into strips (or leave whole if you’re doing dinner)
1 tsp toasted sesame oil
– Marinade –
1/4 cup shallots, chopped
4 garlic cloves, minced
2 tbsp brown sugar
1 tbsp fish sauce
juice from 1 lime
1-1/2 tsp toasted sesame oil
– Sauce –
3 tbsp ketchup
1 tbsp Sriracha chili sauce
2 tsp honey
1 tsp minced ginger (or prepared ginger paste)
4 tsp rice vinegar
Steps
- Combine shallots, garlic, brown sugar, fish sauce, lime juice, and toasted sesame oil. Place the chicken and marinade into a large ziploc bag. Squeeze the air out and seal; then knead the chicken and marinade together. Marinate in the refrigerator overnight (or at least 4 hours).
- Heat 1 tsp of toasted sesame oil in a large skillet over medium-high heat. Thread the chicken on wooden skewers and add to the pan. Cook, turning the skewers, until the chicken is browned on all sides, about 1-2 minutes per side. Reduce the heat to low, cover the skillet, and cook until the chicken is done (about 5-6 minutes, rotating the skewers occasionally).
- While the chicken is cooking, combine the sauce ingredients and mix well.
*Use gluten-free products.
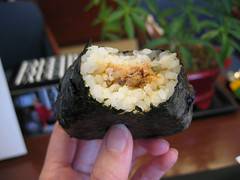
HONEY-GINGER MARINADE/SAUCE
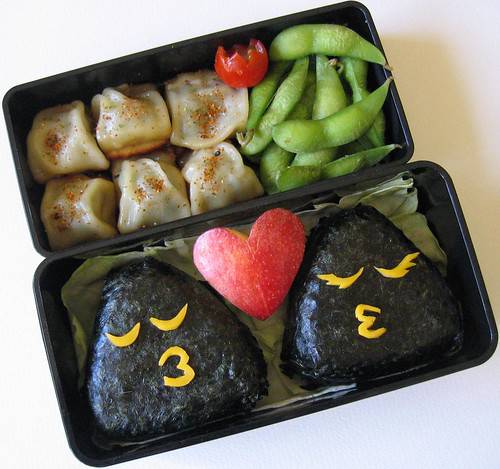
Top: meat & veggie dumplings with sichimi togarashi sprinkled on the top for some kick, steamed edamame tossed in kosher salt
Bottom: kissy onigiri stuffed with a honey-ginger salmon mixture, manzana del amor
Ingredients*
1 tsp. ground ginger
1 tsp. garlic powder
1/3 cup tamari
1/3 cup orange juice
1/4 cup honey
1 green onion, chopped
Steps
- Mix all ingredients well.
- If you are using as a marinade, mix the ingredients in a big ziploc bag, throw in whatever you’re marinating and turn the bag to coat. I like to marinate salmon for at least 30 minutes, although overnight is best.
- If you are using just as a sauce to mix into onigiri filling, you don’t need to cook it. Just use it as is. But if you’ve marinated meat or fish in it, and then you want to use it as a sauce, cook it for a few minutes first on the stove or in the microwave. Easy peasey!
* Use gluten-free products
THAI-STYLE DUMPLINGS WITH MINTY CILANTRO-LIME DIPPING SAUCE
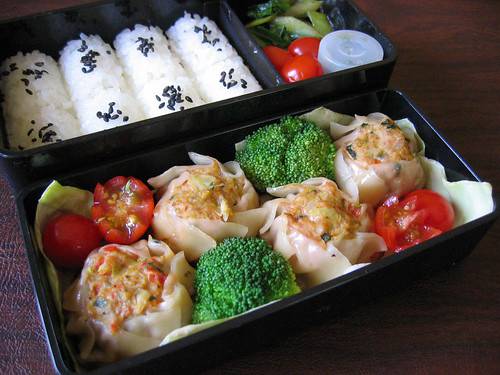
Front: homemade Thai-style dumplings with pork and veggies (not GF), grape tomatoes, steamed broccoli
Back: rice with black sesame seeds, stir-fried bok choy, grape tomatoes, container of cilantro-lime dipping sauce (GF)

Ingredients
– Dumplings –
1 lb. ground pork
1/4 cup minced scallions
2 tbsp. minced cilantro
2 tsp. minced ginger
1 red bell pepper, minced
2/3 cup minced cabbage
2 small garlic cloves, minced
1/2 tsp. toasted sesame oil
2 tbsp. soy sauce
1/2 tsp. salt
pepper to taste
1 large egg, beaten lightly
45-50 shumai wrappers (or round wonton wrappers), thawed if frozen
– Sauce –
1 tbsp. fish sauce
2 tbsp. fresh lime juice
1 tbsp. rice vinegar
1 tsp. sugar, or to taste
2 tsp. minced ginger
1 tbsp. shredded mint leaves
1 tbsp. finely chopped cilantro
Steps
- In a bowl, add the scallions, pork, ginger, bell pepper, cabbage, garlic, oil, soysauce, coriander, egg, salt, and pepper. Mix well with hands. Cook a bit in the microwave and adjust seasonings to taste. Cover and chill filling for 1 hour (or overnight).
- Put a heaping teaspoon of filling in the center of a wonton wrapper, then moisten the edge of the wrapper with water. Form into the dumpling shape of your choice (regular wonton triangles or half-moons, little gathered purses with the filling completely enclosed, etc.). To make ones like mine, pinch the wrapper closed around the filling, forming a mulit-pointed star-like shape with the filling exposed in the middle. Then push all of the points in one direction and squoosh the filling and the dumpling into the shape you want. With a wet fingertip, flatten out the top of the dumpling. Place on a cookie sheet lined with wax paper.
- Continue making dumplings until you run out of wrappers or filling. At this point, the dumplings can be frozen on the cookie sheet or cooked right away. I froze mine overnight, then popped them into freezer bags the next day.
- To cook the dumplings, heat a small amount of oil in a frying pan. Place the dumplings in and cook for 1 minute, or until the bottoms begin browning. Then place about 1/4″-1/2″ of water in the pan, cover and steam until the water is absorbed. Continue adding water as it is absorbed until the dumplings are cooked all the way through (it usually takes at least 6-7 minutes if cooking straight from the freezer).
- To make the sauce, just combine all of the sauce ingredients and mix well. Adjust as you like.
* NOTE: The sauce is pretty strong so do not liberally douse your dumplings before tasting first!
TURKEY BURGERS WITH SPECIAL SAUCE
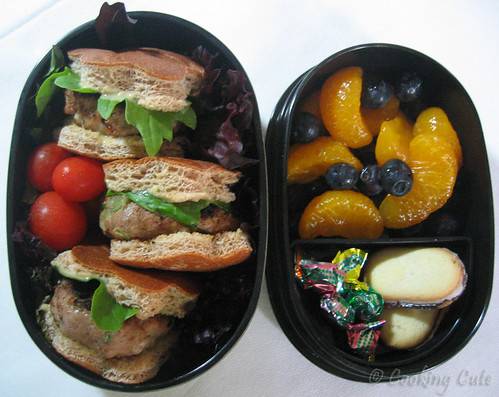
Left: mini-turkey burgers on ‘flower’ buns; grape tomatoes
Right: mandarin oranges, blueberries, mini-mint Milano cookies (non-GF), confetti candy
Ingredients*
– Burgers –
1/4 cup scallions, thinly sliced or chopped
2 tbsp orange juice
1 tbsp low-sodium tamari
1 tsp ginger, peeled and finely chopped
1 garlic clove, minced
1lb. ground turkey breast
Cooking spray
4 hamburger buns (or however many mini-buns you need if you’re doing bento burgers)
4 curly leaf lettuce leaves (or a lettuce mix)
– Special Sauce –
3/4 cup reduced-fat mayo
1 1/2 tbsp scallions, thinly sliced
2 tbsp dijon mustard
1 tbsp honey
1 tsp orange juice
1 tsp low-sodium tamari
1/2 tsp ginger, finely chopped (or use the kind in a tube)
Instructions
- Combine first 6 ingredients in a large bowl.
- Divide turkey mixture into 4 equal portions, if making normal burgers. The recipe is enough for 2 normal burgers and 4-6 mini burgers depending on the size of the mini-bun you are trying to fit. Whether normal burger or mini, they should be about 3/4″ thick.
- Place normal patties on grill rack coated with cooking spray; grill 6 minutes on each side or until done. Or, if making mini burgers, pan frying is fine, about 4 minutes per side or until cooked through.
- Combine all sauce ingredients in a medium bowl and mix well.
- Spread Special Sauce over top and bottom halves of each bun. Place lettuce leaves on the top halves of buns; top bottom buns with a burger patty, then top with the top bun and lettuce. If you’re doing normal bugers, cut them in half before serving.
* Use gluten-free products
THE BEST DIPPING SAUCE EVER
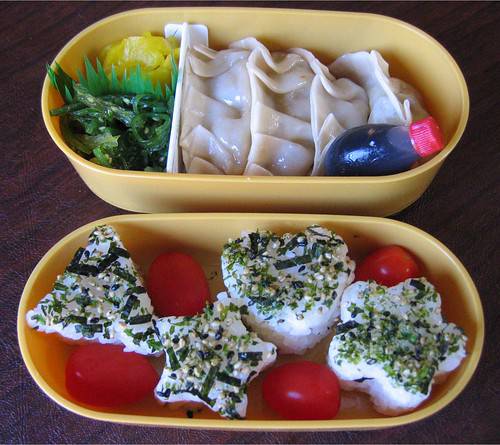
Top: pickled daikon, seaweed salad, homemade shrimp gyoza, and a piggie of The Best Dipping Sauce Ever
Bottom: rice with furikake, grape tomatoes
Ingredients*
1/2 cup tamari
1 tbsp. water
2 tsp. sugar
2 tbsp. rice vinegar
1 scallion, thinly sliced
1 garlic clove, minced
1/2 tsp. toasted sesame oil (regular sesame oil ok)
1 tsp. sesame seeds
Steps
- Whisk all ingredients until well-mixed.
- That’s it.
* You can also add hot pepper sauce or some other form of chiles to taste.
CHICKEN KATSU WITH TONKATSU SAUCE
Ingredients
– Chicken –
4 skinless, boneless chicken breast halves – pounded to 1/2 inch thickness
salt and pepper to taste
2 tablespoons all-purpose flour
1 egg, beaten
1 cup panko bread crumbs
1 cup oil for frying, or as needed
– Sauce –
2 tbsp. sugar
2 tbsp. soy sauce
2 tbsp. worcestershire sauce
2 tbsp. ketchup
Steps
- Season the chicken breasts on both sides with salt and pepper.
- Place the flour, egg and panko crumbs into separate shallow dishes. Coat the chicken breasts in flour, shaking off any excess. Dip them into the egg, and then press into the panko crumbs until well coated on both sides.
- Heat 1/4 inch of oil in a large skillet over medium-high heat. Place chicken in the hot oil, and cook 3 or 4 minutes per side, or until golden brown.
- Combine sauce ingredients and mix well.
DESSERT - MANGO STICKY RICE
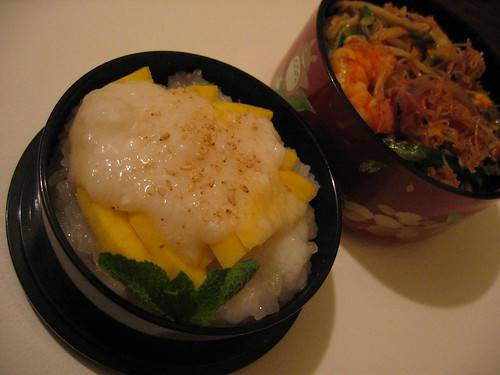
Front: mango sticky rice
Back: Singapore char mee hoon (leftovers!)
Ingredients*
– Sticky rice –
2 cups sticky rice
2 cups coconut milk
1 cup sugar
1/2 teaspoon salt
2 ripe mangoes, cut into thick slices
– Topping –
1 tbsp toasted sesame seeds
1 tbsp tapioca starch
1 tbsp sugar
1/4 tsp salt
Steps
- Cook the sticky rice as you normally would. I used my rice maker, which has a sweet rice function. I measured out 2 rice-maker cups (which are smaller than normal cups) of rice, rinsed it clean, then let it soak for about 6 hours. Then I drained it, placed it in the rice maker bowl and filled in the water up to the line for 2 cups (the water barely covered the rice). Then I closed the lid and hit cook. If you don’t have a rice maker, you can steam the rice.
- While the sticky rice is cooking, mix together 1.5 cups of the coconut milk, the sugar and salt and bring to a boil. Then set the sauce aside to cool.
- Immediately after the sticky rice is cooked, and still hot, put it into the coconut sauce and stir well. It will look a little soupy. Cover for 1 hour and let cool. The rice will absorb the coconut sauce.
- To make the topping, mix the remaining 1/2 cup of coconut milk with the salt, sugar and tapioca starch. Bring to a boil, then set aside to cool.
- To serve, put the sticky rice on a dish and lay the sliced mangoes on top. Pour the topping sauce over the sticky rice and sprinkle with toasted sesame seeds.
* Use gluten-free ingredients
Join Our Mailing List
The temple is funded completely through the kindness of its supporters
Thank you for your support!